Recipe Admirers !!!!!!

Thursday, 15 August 2013

"Raisin Golden Cookies"

Happy Independence Day people. 

I like to play with different dryfruits while baking as they provide a lot of texture and taste to the whole recipe. Raisins, almonds, cashews,walnuts,pinenuts,dates,figs,pecans,etcetc. You can use any of these magical ingredients or a mix of them and convert your plain and dull cookies and cakes into something marvellous that will be devoured by elders and kids at all times. 
Today I am sharing a simple homestyle and damn easy recipe of Raisin cookies. All you need is simple cookie ingredients and some golden raisins to bake these fancies. 
Enjoy the sweet raisins recipe and have a wonderful day.


" Raisin Golden Cookies"

Ingredients:

1 cup self raising flour
1 tsp baking powder
a pinch of salt
1/2 cup brown sugar or normal caster sugar
5-6 tbsp soft butter
1 small egg
few tbsp of milk ( around 1/8th cup)
5-6 drops of vanilla essence
1/2 cup golden raisins
1 tsp cardamom powder


Preparation:
  • Preheat the oven at 190*C for ten minutes before baking. Line baking sheets with baking or parchment paper ( Do not bake without the baking paper as the cookies will stick to the tray and break while lifting)
  • Take a bowl and add flour,baking powder,salt and cardamom powder. Mix well.
  • Add sugar,butter,egg and milk. Whisk well to form a smooth dropping batter. Add vanilla essence and mix.Once its throughly mixed add raisins and mix.
  • Now take a deep spoon and drop small cookie sized drops on the baking sheets. ( Do not drop bigger portions as the cookies will expand while baking. Also keep a good space between cookies to give them area to expand). 
  • Bake these cookies in the preheated oven for around 10 mins till golden brown from sides and light brown on top.
  • Remove from oven and let them cool before removing from the paper. ( Do not remove when hot as they will crack)
  • Once cool remove and store in an air tight container. As it contains egg consume them within two to three days or else store in refrigerator after two days. 
Note : Do not overcook the cookies else they will get hard and burnt. Also you will need to keep a watch while baking as once the oven is hot, the second batch might bake in around 8 minutes.


Sunday, 28 July 2013

" Fudgy Mushy Brownies "

In the beginning, the Lord created chocolate, and he saw that it was good. Then he seperated the light from the dark, and it was better. 

Oh, divine brownies. Any season, any occassion or any day, one form of cake that will never get old is Brownies. A single square chunk of this delicious cake is enough to uplift your tastebuds. 
Plain brownies, brownies with icecream or sizzling brownie, you will relish it in any form and crave for more. 
I have shared walnut brownie recipe before and today I will share another dense chocolate brownie recipe. 
This Brownie recipe creates fudgy, dense and extremely rich brownies. 
Enjoy the recipe :)


" Fudgy Mushy Brownies"

Ingredients : 

1/2 cup soft butter
3/4 cup sugar 
2 eggs
1 tbsp vanilla essence
1/3 cup cocoa powder
1/2 cup self raising flour
a pinch of salt
1/4 tsp baking powder


Preparation:
  • Preheat the oven at 180*C for ten minutes before baking. Line a square brownie or cake baking dish with butter or parchment paper
  • Beat the butter and sugar together till light and fluffy. Add eggs and whisk well. Add vanilla essence.
  • Add cocoa powder,flour,salt and baking powder. Mix well and form a smooth batter
  • Drop the batter in the lined tin and make it even
  • Bake in the preheated oven for 25 minutes. Check with a toothpick or knife. Do not overbake.
  • Let it cool. Slice in square pieces and store in an airtight container. 

You can enjoy the brownies they way they are or make them more tempting by adding some fudge icing.
To make the icing - mix little butter, cocoa powder and icing sugar together and make it smooth. Pour this icing on the brownies when its still warm and fresh. Once cool, slice and serve. 


Wednesday, 10 July 2013

"Dense Chocolate Muffins - Pure Indulgence "

Forget Love -- I'll rather fall for Chocolate !!!!

I am back with a little more of choco indulgence. Earlier in my blog I have already shared two chocolate muffin recipe ( with and without eggs), but as my love for chocolate is neverending,so here I am with another beautiful recipe.
I created these muffins as an experiment with dark and white chocolates. I had these two bars lying in my fridge craving to get converted in some wonderful dessert. I used them both with some staple muffin ingredients and Voila ! what came out was the most indulgent and magical muffins that I had ever eaten.
This recipe creates completely dense, rich and chocolate indulgent muffins. Pair them up with a cup of coffee and you will not want to talk to see anything else.
You can store them in air tight container for upto a week after refrigeration.
Enjoy this recipe and a little kick of that chocolate ;)


"Dense Chocolate Muffins - Pure Indulgence "

Ingredients :

100 gms dark chocolate
100 gms sugar
50 gms butter
250 ml milk
1 tsp vanilla essence
2 eggs
300 gms flour
1 tbsp baking powder
a pinch of salt
150 gms white chocolate


Preparation:
  • Soften the dark chocolate by keeping it at room temperature for few hours. Once soft, break and whip it in a bowl to form a creamy texture ( If not then warm it in microwave for 10 secs and then whip)
  • Sieve flour, baking powder and salt in a big bowl. 
  • In another bowl whisk butter, sugar and eggs till light and fluffy. Add this to the flour mixture. Mix well
  • Add milk, vanilla essence and mix it properly to form a smooth pouring batter.
  • Now add the dark chocolate liquid and whisk for few minutes. 
  • Chop the white chocolate in small fine pieces and add it to the batter. Give it a slight stir to avoid breaking the white chocolate. 
  • Line the muffin cups or tray with baking or parchment paper. Fill the cups with the muffin batter till 3/4th quantity. 
  • Bake in pre heated oven at 180*C for 30-35 mins till all the muffins are well risen and baked. The top part will be a little broken once they are fully done. 
  • Let them cool on a wire rack. Unmould and serve. 
Note : You can use nuts like almonds and walnuts in these muffins. You can also drizzle some white chocolate shards on top before baking. You can use either chocolate compound or any other type of chocolate for this recipe. 


Wednesday, 12 June 2013

" Whole Wheat Apple Crumble Cake" - Eggless

Monsoon and a big appetite comes as a bundled package for three months. As the temperature starts dropping, our urge to eat fried and hot things starts increasing. I love to bake in this season and pair it up with hot cups of tea and coffee. Nothing is more beautiful than sitting by your windowsil, watching the raindrops and greenery and enjoying some yummy bakes and cakes in this weather.
So, let me share another wonderful recipe of Apple cake. This recipe is eggless and consists of whole wheat and brown sugar. You can enjoy each bite without worrying about those excess calories :)
Enjoy the recipe and the beautiful weather. 


" Whole Wheat Apple Crumble Cake"

Ingredients : 

1+1/2 cup whole wheat flour
2 small red apples - finely chopped
1 cup brown sugar ( you can reduce the quantity a little as the apples will be sweet)
1/3 cup of olive oil
1 small cup of warm water
1 tsp baking soda
1 tsp baking powder
1/2 tsp salt
5-6 drops of vanilla essence
1 tbsps of ground spices ( cinnamon,clove,nutmeg) - optional
1 cup walnuts chopped


Preparation:
  • Sift the flour, baking powder and baking soda in a mixing bowl
  • Mix the oil,sugar and vanilla essence.
  • Add the oil mixture to the flour mix and mix well.
  • Add salt,spice powder and warm water and beat to form a smooth mix.
  • Add apples and walnuts and mix well.
  • Grease a cake tin and line with paper. Pour the cake batter and set well.
  • Bake in a preheated oven at 180*C for 25-30 mins till brown and done. Check with a skewer or toothpick.
  • Let it cool on a wire rack, remove and serve.

Note - This cake will have a nice crumbly crust on top. Serve it warm with custard sauce in cool weather and with icecream in warm weather. You can store this cake in an airtight container for two to three days.

Sunday, 2 June 2013

"Mango Delight"


Mangoes are ruling the market right now. I had to make atleast one dessert before the season ends and what could be more better than a chilled Mango pudding cake. If you have tried my previous recipe on Mango cheesecake then you will definitely love this one.
This recipe is super fast, delicious and light to taste. Do try this recipe and enjoy the beautiful weather :)


" Mango Delight"

Ingredients :

2 big ripe mangoes
1/2 cup thick cream
1/2 cup cottage or cream cheese
4-5 tbsp sugar
1 tsp cardamom powder
1 small loaf ( 50gms) cake loaf ( any flavour will do. You can use readymade cake slices)
8-10 digestive biscuits
4 tsp butter - soft 
Mixed nuts - almonds and cashews chopped
chocolate powder for dusting


Preparation:
  • Grease pudding moulds with butter and keep aside. 
  • Crush the digestive biscuits and mix with butter. 
  • Press the mixture in the moulds to form a smooth layer at the bottom. Keep in the fridge to chill
  • Use a blender and add mangoes, cream,sugar,cheese and cardamom powder. Blend to form a puree.
  • Remove the moulds from the fridge. Make thick slices of the cake and place in the center. Add few chopped nuts over it.
  • Pour the mango puree on top of the biscuit and cake layer. Repeat the process with the other moulds till all the puree is used. 
  • Refrigerate for atleast 4-5 hours till set and firm. 
  • To serve, remove from the fridge. Run a sharp knife around the pudding before inverting it on a plate. Be careful at this stage to avoid breaking the dessert. ( I prefer using silicone moulds for these types of dessert as its easy to invert the dessert). The biscuit layer will be on top after its removed
  • Dust with chocolate powder and serve chilled. 
Note : You can use vanilla or chocolate cake as that adds to the texture and flavour of this dessert.


Tuesday, 21 May 2013

"Coconut Cake"

I had to go to a friends place for dinner so I baked this yummy cake to gift them. This cake is a lovely sponge cake with the goodness of coconut and caramelisation of brown sugar. You have the option of using fresh grated coconut but it tastes best with dried shredded coconut. The use of brown sugar on top adds crunch and texture to the cake and adds in more flavour. 
Hope you like this recipe and enjoy the coconutty sponge.


" Coconut Cake"

Ingredients :

175 gms self raising flour
1 tsp baking powder
100 gms soft butter
100 gms caster sugar
2 eggs
2 -3 tbsp milk
few drops vanilla essence
4 tbsp coconut powder ( dried shredded coconut)
3 tbsp brown sugar
2 tbsp dried coconut powder for garnishing
handful of chopped cashews and raisins

Preparation:
  • Preheat the oven at 180*C for ten minutes before baking
  • Sieve flour and baking powder together.
  • Mix butter and sugar together till light and smooth. Add both the eggs and whip the mixture properly.
  • Add vanilla essence and mix well. Pour this mixture in the flour and mix it properly.
  • Add milk and keep mixing to convert it into a smooth batter. Add coconut powder and mix well.
  • Add chopped nuts, mix and the batter is ready.
  • Grease a cake tin and line it with a baking parchment paper. Pour the batter in the prepared tin.
  • Bake the cake in the preheated oven for 25 minutes. Switch off the oven. Garnish the cake with brown sugar and coconut powder mix and bake it again for another 10 minutes. 
  • Cool on a wire rack. Cut and serve. 

Note : You can skip the brown sugar garnishing if you wish to place icing on this cake. This cake tastes best with butter cream icing and brown sugar syrup. You can serve this cake with smooth butterscotch icecream for a complete dessert.


Monday, 8 April 2013

"Bolinhas -- Tea Time Cookies"


Biscuits and cookies are an integral part of every kitchen cupboard. I cant imagine having tea without cookies on any day. I usually stock up on different flavoured cream biscuits and sweet & salt ones. So this time I thought of making some different ones at home. Todays recipe is of a Goan teatime cookie called Bolinhas. These cookies are absolutely flourless and light and chewy. They taste best with a cup of tea or a scoop of icecream on a sunny day. You can prepare a lot many and store in an airtight container for upto a week. 


" Bolinhas - Tea Time Cookies "

Ingredients : 

1/2 cup grated coconut 
3/4 cup fine semolina
1 egg
2 tbsp butter
less than 1 cup fine caster sugar
10-15 cashewnuts - chopped
1/2 tbsp cardamom powder
1/2 tsp salt

Preparation:
  • Beat the egg till light and fluffy. Cream the butter.Add the egg,semolina,sugar,chopped cashews,cardamom powder and salt and mix well.
  • Set this mixture aside for atleast eight hours to ferment.
  • After eight hours add the coconut and mix well. 
  • Line a baking tray with butter or parchment paper. 
  • Bake small balls of the mixture and flatten slightly to shape like a cookie. Arrange on the baking tray.
  • Bake in a preheated oven at 180*C for around 15-20 minutes till light golden brown.
Note : For soft and fluffy bolinhas, it is important to ferment the batter for eight hours else they will get hard after baking. You can decorate them with cashewnuts on top before baking.

Friday, 29 March 2013

"Parwal Mithai/ Sweet Pointed Gourd"

It was the festival of Holi two days back and I had a lovely time with family and good food. Hope you all too had a wonderful Holi. Apart from the default gujiyas and sweets, I tried a very old sweet recipe ( mostly prepared in Northern parts of India ) which I last had in my school days. I remember my aunts making this sweet on special occassions and it used to taste divine. When I saw parwals (pointed gourd) vegetable in the market, I instantly had the urge to make it for Holi.
So here I am sharing yet another old and sweet recipe of Parwal Mithai/ Sweet Pointed Gourd today.Its easy to make and delicious to taste. You can make it in big quantity and store in airtight container in the fridge for upto a  week. 


"Parwal Mithai/ Sweet Pointed Gourd"

Ingredients :

250 gms Parwal ( Pointed Gourd)
200 gms khoya/mawa ( dried whole milk)
2 cups Thin sugar syrup ( made with 1/2 cup sugar and 2.5 cups water)
3/4 cup sugar
1 tbsp ghee ( clarified butter)
cardamom powder
almonds/pistachios for garnish


Preparation:
  • Peel the parwal vegetable and slit it midway lengthwise and remove the core.
  • Blanch the parwals in hot water for 5-6 minutes and remove in a seive to remove the excess water.
  • Prepare the sugar syrup to a thin ( one wire) consistency and add parwals. Cook them in the syrup on slow flame for around 10-15 minutes till they are cooked and soft. You will see a slight colour change once they start cooking. Switch off the gas and cover the pan and leave for another 10 minutes to soak. Drain the parwals and let them cool
  • To make the stuffing, heat ghee and saute the khoya in a non stick pan on medium heat till it becomes soft and changes slight colour ( you will get the aroma of cooked khoya)
  • Add the sugar and and saute till light golden in colour
  • Add cardamom powder and few chopped nuts and mix well.
  • Let the mixture cool for sometime before stuffing
  • Now to prepare the sweet, take the parwal and stuff it with the mixture properly. Repeat the process with all the parwals. Garnish with chopped nuts and chill for few hours before serving.


Notes : You can use readily made khoya barfis or any other flavoured burfis/milkcakes for the stuffing if you cant make the khoya filling. You can also use saffron for garnish and in the stuffing to add more flavour. 


Friday, 22 March 2013

"Classic Swiss Meringues"

Hello guys.. I know I have not been in touch for few days now and havent shared any yummy recipe with you all. Hope you all are enjoying yourself and preparing for Holi and Easter holidays. 
After a month I managed to get back to baking and absolutely loved it. I realised how much I missed it as soon as I smelt the lovely aroma coming out of my oven.
So here I am sharing yet another beautiful and simple recipe today. This weekend I made something special for a special friend. These beauties are light, airy, munchy, tasty, melts in your mouth and vanish like thin air in seconds. These special treats are called Meringues. 
Today I'll share a simple and lovely recipe of Classic Swiss Meringues. 
Meringues are the most fragile sweets that you can make and devour. You can enjoy them plain or sandwitch two with peanut butter or chocolate sauce or whipped cream or caramel and so on. These can also be enjoyed with ice cream or just crush them on your shakes and puddings. You can make in plenty and store them for weeks and enjoy in different versions. 
So try making some of these beauties this weekend and make your summer desserts more special.


" Classic Swiss Meringues"

Ingredients :

4 egg whites
240 gms superfine powdered sugar 
2 tbsp vanilla essence
1 tbsp rose water - optional
few drops red or pink food colour


Preparation:
  • Preheat the oven to 100*C. Line a baking tray with butter paper evenly.
  • Use hand mixer or electric mixer and whip the egg whites in a large bowl till light and foamy. It should take approx 10 mins with an electric hand/ standing mixer.
  • Slowly add the sugar and start whisking till all the sugar is incorporated. Do not add all at once. 
  • Continue whisking for another 10 mins till the mixture is glossy and forms firm peaks. ( You can test this by removing the whisk and checking  if the mixture stays or falls in the bowl. If its firm it will stay)
  • Add vanilla essence and mix it gently with a rubber spatula or silicone spoon from out to in direction so that you dont break the air.
  • Add few drops of any colour and just swirl it in the mix like a rainbow pattern. You will get a ripple effect by doing this. You can use a skewer or toothpick to do this.
  • Take two big spoons. Drop big spoonfuls of the mix on the baking tray and try and form small peaks with the help of the other spoon. ( Refer pic for the peak)
  • Bake in preheated oven at 100*C for an hour. Switch off the oven and the meringues cool off completely in the oven itself ( you can leave the oven door slightly ajar)
  • Once completely lift them gently from the butter paper and store them in airtight container for weeks.


Notes :- While whisking egg whites please ensure that the mixer and bowl is completely clean and not at all greasy else they will not foam or form peaks. Its better to use electric mixer for this recipe to get better results.Always use baking or parchment paper else the meringues will stick to the tray and break while lifting.Do not bake them on higher temperature else they will brown and not retain the original colour and taste. Its ok to see slight cracks on them after baking. You can use any colour or flavour for the mix. 
Add some chocolate or nutella to get variety of flavours. Ice or sandwitch them with chocolate or cream sauce and dust with nuts and icing sugar to form a delicious dessert.

Thursday, 14 February 2013

Valentine Whole Wheat Cupcakes !!!

Cupid visited me today and wanted to eat some fresh homemade cupcakes :)
Its Valentine's day and there is way too much romance in the air. Everyone is celebrating this special day in their own special ways and I started mine with some baking today.
I wanted to bake something simple, healthy yet cute for my better half. So here is a special Valentine recipe for Whole Wheat Cupcakes with Simple Butter glaze icing.
You can just opt for the plain cupcakes if you want to go completely healthy. Yet you can cover it up with any frosting of your choice and make them taste and look more wonderful for any occassion.
Hope you enjoy the recipe and have a Happy Valentines Day !!!!


" Valentine Whole Wheat Cupcakes"

2 bananas - ripe
1/3 cup olive / vegetable oil ( prefer olive though)
4 egg whites
1 tsp vanilla essence or extract
2 and 1/2 cups whole wheat flour
1/3 cup brown sugar
1/2 tsp cinnamon powder
2 tsp baking powder
1/2 tsp salt
1/2 tsp baking soda

Preparation:
  • Mash the banana and mix with egg whites, oil and vanilla essence in a bowl
  • Mix flour, brown sugar,cinnamon,baking powder,salt and baking soda together.
  • Add this flour mixture to the banana mix slowly and keep mixing to form a smooth batter
  • You can add little milk if the batter is not smooth and of dropping consistency
  • Line a muffin tray with paper cups or grease it with little oil
  • Drop spoonful of batter in muffin cups and bake in the preheated oven at 180* for 20 minutes
  • Check with a toothpick or knife if cooked.

For icing on the cupcakes, you can opt for Royal butter icing, Whipped cream icing, Marzipan or fondant icing, etc. 
I made a simple icing by whipping 50 gms butter with 125 gms icing sugar, 3 tsps milk and a drop of pink colour. Once its smooth and whipped spread on the cupcakes and decorate with sugar pearly and cherries. 
Let it set for sometime and serve.


Thursday, 31 January 2013

"Lovebirds Special Celebration Cake"

Its the month of February and I can already sense a lot of Love in the air :)
Valentine's Day is one of the most special day for all the couples and everyone likes to impress their better half on this special day. So I dedicate this month to all you lovebirds and will post some recipes that you can make for the special people in your life. 
Though I am sure we dont need a specific day to portray our love for anyone. You can do that all the year round and make people happy with some yummy dishes :) 
So lets celebrate this lovely month and to start with I am sharing a Hearts celebration cake recipe that I made for my better half on our wedding anniversary. 
Its a simple yet exotic cake. When you look at it, you may feel that there is a complicated process behind making it. But, trust me its quiet simple and can be made with readily available ingredients. I skipped cream based frosting in this cake as it makes the cake more dense and heavy and reduces the lifespan. So this time I opted for some lighter ingredients that adds texture, beauty and taste to the cake. You can always create this beauty in your way and style using diff ingredients and shapes.

Enjoy the recipe and have a lovely "Love" month !!!


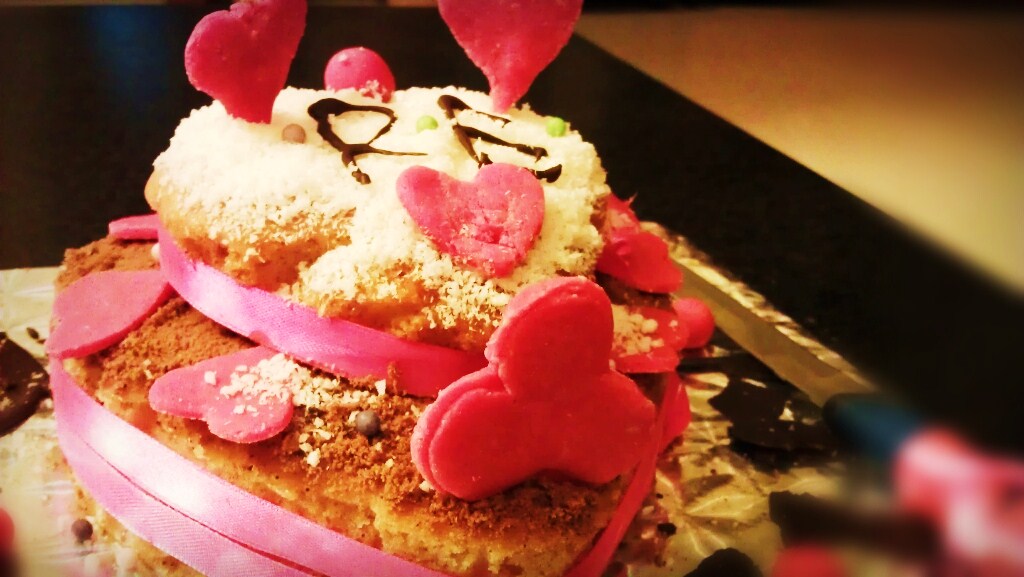
" Lovebirds Special Celebration Cake"

Ingredients : 

For the Cake base (Eggless) - 

1/2 tin condensed milk
1/2 cup milk
1/2 cup oil
2 tbsp powdered sugar
1 cup flour
1/4 cup cornflour
1/2 tsp soda bi carb
1 tsp baking powder
1/4 cup soda water ( bottle of soda)
1 tsp vanilla essence

For Marzipan Hearts and flowers - 

25 almonds - blanched, peeled and dried
3 tbsp icing sugar
2-3 drops of almond/ vanilla essence
red or pink colour

For Frosting or Decoration - 

1 cup chocolate cookie powder ( grind half packet chocolate cookies)
1/2 cup dessicated coconut
1/2 bar chocolate melted
One tray or cake board wrapped in silver or golden paper
Pink or Red ribbons to decorate the sides
Sugar pearls - coloured
2-3 tbsp Jam or Honey ( any flavour)
Baking tins - one medium sized heart shaped tin and another small heart shaped tin. Grease both and line with butter paper.

Preparation :

For Cake Base  :-
  •  Sift flour, cornflour,soda bi carb and baking powder in a wide bowl. Keep aside
  • Mix sugar and condensed milk together till light and smooth. Add oil and beat well
  • Add this liquid mixture to the flour.Add milk slowly and keep whisking to form a smooth batter and avoid any lumps. Add essence and mix well. 
  • Pour soda water and mix quickly till the batter is fully smooth and light.
  • Immediately pour the batter in both the tins. 
  • Bake in preheated oven at 150*C for 40 mins. Check with a skewer if it comes out clean then cake is cooked.
  • Once cool, unmould and keep aside.
For Making Marzipan hearts and flowers - 
  •   Grind almonds. Add icing sugar and essence and knead it to make a dough. If it looks rough then add 2 drops of water to make is smooth and pliable. Knead well with your palms on a smooth surface for about 7-8 minutes till its smooth and the surface and clean and shiny.
  • Rest the dough in the fridge for about 5 minutes. Remove and again knead for a minute and add 2-3 drops of your favourite colour. Knead well to spread the colour uniformly.
  • Now make small balls of the dough . Dust some icing sugar on the surface and roll these balls a little to flatten them. Using a cookie cutter cut the dough in heart or desired shapes and keep aside. You can make hearts, flowers, stars,etc. 
  • You can also stick two hearts together and fix a toothpick in the centre to fix in the cake as props ( as shown in the picture)
  • Once all the shapes are created store them in the fridge till use.

For Chocolate Shards - 
  • Chop chocolate and melt it in the microwave or double boiler till soft. 
  • Using a rubber spatula quicly spread melted chocolate on a butter paper in thin layers of any shapes. Keep in fridge to set
  • For names and sticks fill the remaining melted chocolate in a paper cone and pipe the desired alphabets and shapes on a butter paper. Keep in fridge to cool and set.
  • Once set after 1-2 hours, remove them slowly from the paper and decorate on and around the cake.

For Decorating the Cake - 
  • Tie ribbons around both the cakes to give a satin bow effect ( as given in the pic)
  • Place the bigger base on the cake board. Put a layer or jam/ honey on top of the base. Dust it with cookie powder to cover the top completely. ( The jam will act as a glue here ) 
  • Place the small base on top of the bigger one. Layer it with jam/honey. 
  • Dust it with dessicated coconut to form a even white layer.
  • Decorate the marzipan props on top of the small cake and around the big cake ( refer the pic)
  • Place your alphabets on top of the small cake. ( optional)
  • Decorate the cake board with Chocolate shards and dust it with some coconut powder. 
  • Throw some sugar pearls and Marzipan balls all over to give a colourful effect. 
  • Tie ribbon around the cake knife and place on the side
  • Your beautiful Hearts cake is ready. 

Note : You can skip or add any of these steps as desired. If you want to go for butter or cream frosting then use a coloured frosting on both the cakes and decorate with chocolate shards and sugar pearls.


Monday, 24 December 2012

"Xmas Plum Cake"

I am keeping my promise to share the recipe of Rich Plum cake to celebrate this Christmas. Its Christmas eve and its time to open some sparkling wine or champagne with rich plum cake slices.
I hope you all had soaked dryfruits in Rum as per my previous pre cake update and ready with your ingredients now.
So lets not waste more time and get started with the cake preparation. I made these today and trust me they look so delicious that I cant wait to dig in post midnight ;)
Hope you like the recipe and prepare this for Christmas tomorrow and enjoy with your friends and family.
Wishing you all a very Merry Christmas . Have a beautiful Christmas :)


" Xmas Plum Cake"

Ingredients:

Pre soaked dry fruits and spices ( please follow my previous recipe on the same)
2 cups flour
2 cups powdered sugar
200 gms butter
2 tsp baking powder
6 eggs
2 tbsp vanilla essence
salt a pinch
2 tbsp orange juice
Few tablespoons of Brandy or Rum

Preparation:
  •  Preheat the oven at 177*C for ten minutes before baking
  • Sift the flour,salt and baking powder together. Mix the soaked dry fruits in the flour nicely
  • Beat butter and powdered sugar together till light and fluffy. Add eggs one at a time and keep whisking till the batter is mixed properly and smooth
  • Add vanilla essence and orange juice to the batter and mix properly
  • Add the liquid batter to the flour mixture slowly and mix well to avoid any lumps.
  • Add a tsp of brandy and mix well.
  • Pour the batter in greased or lined cake mould and bake for 45 minutes. ( I could make two cakes with this batter so try distributing it in two small cake moulds)
  • Check with a knife or toothpick if it comes out clean. Remove cake from oven. Immediately sprinkle two tbsp of brandy or rum to enhance the flavour and increase the lifespan of the cake.
  • Slice and serve. Store the remaining cake in an airtight container. Keep in refrigerator if storing for a little longer

Note : You can skip adding more brandy or rum if you dont want additional liqour in the cake. You can also more mixed spices powder in the batter to enhance the flavour.


Saturday, 22 December 2012

"Dates & Figs Cake - Eggless"

Christmas day is coming nearer and nearer and so is the excitement to celebrate :)
I am sure you all are busy preparing cakes and muffins for the big day so I thought of sharing a quick and delicious recipe of Dates & Fig cake. This cake is dense, rich and eggless which makes it perfect to enjoy on   a Christmas day. Another good thing about this cake is that you can enjoy its warmth in this chilly weather as dates and figs are perfect fruits for the winter season.
Enjoy the recipe and keep sending your posts and feedback :)


"Dates & Figs Cake - Eggless"

Ingredients :

1 cup chopped dates ( seedless)
1/2 cup chopped dried figs
1 cup plain flour
1/2 tsp vanilla essence
1/2 tin condensed milk 
1 tsp baking powder
1/2 tsp soda bi carb
1/2 cup oil
Few cashewnuts for garnishing

Preparation:
  • Preheat the oven at 150*C for ten minutes before baking 
  • Chop the dates and figs finely and put in a deep pan. Add 6 tbsp of water and heat gently together on low flame for 2 minutes. Remove from heat and add soda bi carb. Mix well and keep aside for 15-20 minutes
  • Sift flour and baking powder together in a mixing bowl.Mix dates mix with the flour. 
  • Beat oil and condensed milk together till smooth and add vanilla essence. Mix well.
  • Pour this liquid to the flour mixture and mix well till the batter becomes smooth and of dropping consistency.
  • Grease a small cake or loaf tin and put butter paper to prevent cake from sticking. 
  • Pour the batter in the tin and garnish with cashew pieces.Bake in preheated oven for 45 minutes. Check with a knife before removing the cake if its done or not.
  • Slice the cake and serve warm with coffee or tea.
Note : You can frost this cake with whipped cream before serving. Store this cake in an airtight container for longer shelf life. This cake will be little dense and heavy so you need to grease the tin well or use butter paper before baking. Decorate the cake with cashew or walnuts for additional flavour/taste.


Wednesday, 12 December 2012

"Sponge Fingers with Strawberry Coulis"

Its the season for Strawberries. I love the rich red colour and the aroma of this beautiful fruit. Eat it like that or convert it into jams, sauces, pulps or icecream. You can enjoy this luscious red fruit in any and many ways.
Christmas season is about guests and family gatherings and celebrations. The whole idea of celebration revolves around good food and wine :) Listening to carols and chitchatting with your friends and family,you will not get enough time to prepare massive desserts. So I am sharing a quickfix dessert for you which you can serve for coffee or after dinner. Prepare the sponge cake and sauce in advance and store it in an airtight container and you can prepare this dessert in a jiffy without putting in much effort ;)
Hope you enjoy this simple and delicious recipe. Happy Baking !!!!!


" Sponge fingers with Strawberry coulis"

Ingredients :

For Sponge cake please follow my Eggless Tea Cake or Britannia Fruit Cake recipe. You can also use a readymade vanilla sponge for this dessert

For Coulis :

250 gms fresh strawberries
80-100 gms castor sugar ( as per your sweet tooth)
1 tbsp of lemon juice
some fresh strawberries to decorate
Icing sugar for dusting

Preparation:
  • Rinse the strawberries and remove the leaves from berries.
  • Put the berries and sugar in a pan and put on low heat. Simmer softly for around ten minutes or till the fruit has become soft. Let it cool.
  • Once its cooled down blend it together. Seive the syrup to get a smooth sauce.
  • Add lemon juice and mix well.
  • Chill the coulis before serving
  • To serve, cut slices of the cake and arrange on a plate. Drop some spoonfuls of coulis all around and over the slices. Decorate with freshly cut strawberries and dust it with some icing sugar. Serve chilled
Note : You can store this coulis for upto a week in an airtight container in the fridge. Just like strawberries you can make this sauce with Raspberries, Blueberries,etc for different taste and colours. 
If you want to experiment more then try using chocolate cake slices with the coulis and enjoy the sinful taste:)
Also, you can decorate the dessert with other freshly cut fruits like bananas or oranges. I also like to pour a littlt hot chocolate sauce on the plate to add more dimension to this dessert. There are way too many options to add to this simple cake and coulis and make it extraordinary so keep trying new versions and do share them with us. 


Thursday, 6 December 2012

"Pre Christmas Plum Cake Preparation"

Traditional Christmas Plum cake calls for a month long soaking of dry fruits and spices in Rum or Brandy. So keeping this lovely and delicious tradition in mind, I have done my Plum cake preparations and I am already looking forward to a rich,yummy and delicious Xmas cake.
Have you all started the Christmas preparations yet ???
Get ready for Christmas and soak some nuts tonight :)

I will share the Christmas plum cake recipe before the festival. Till then Happy Baking !!!!! 


"Pre Christmas Plum Cake Preparation"

Ingredients :

1/2 cup raisins
1/2 cup chopped almonds
1/2 cup chopped cashews
1/2 cup tutti frutti
1/2 cup candied cherries
1/2 cup black currants
1 tbsp powdered cinnamon
few orange and lemon peel
1 cup Rum or Brandy

Preparation:

Mix all the dry fruits and spices and soak in Rum/Brandy in an airtight container and keep in the fridge till Christmas. 


Tuesday, 4 December 2012

" Banana & Carrot Muffins - Eggless "

Have yourself a merry little Christmas.
Let your heart be light,
From now on our troubles
Will be out of sight.

Christmas is coming nearer and the excitement to celebrate the festival has already begun. Rum cakes preparation is going on, carols are playing and everyone is looking forward to the party season. So what are we waiting for??? Lets start the month with some yummy sweet treats and enjoy with our family and friends.
Today I am sharing a simple yet yummm Banana & Carrot Muffin recipe. Its eggless and has the goodness of whole wheat ( pssst less calories ;) ) ..
Will post more yummy Xmas recipes this month and I hope you all will like them. Enjoy the season and have a beautiful December. Keep Baking :)))))


" Banana & Carrot Muffins - Eggless"

Ingredients :

3/4th cup whole wheat flour
3/4th cup self raising flour
1and 1/2 tsp baking powder
3/4 tsp soda bi carb
1 cup grated carrots
2 tbsp raisins
1/2 cup butter - softened
1 tsp vanilla essence
1 cup powdered sugar
2 ripe bananas - mashed or blended in a mixer
1/3 cup milk ( approx)


Preparation :
  • Seive both the flours in a bowl with baking powder and soda bi carb.
  • Add carrots and raisins and mix well. 
  • Beat butter, vanilla essence and sugar till light and fluffy.
  • Add the flour mixture to the butter mixture slowly and mix well. You will get a thick lumpy batter
  • Add banana puree to the mixture and mix. Add little milk and mix well. You need to add as much milk that will give you a smooth cake batter. 
  • Preheat the oven at 160*C for ten minutes before baking
  • Line muffin moulds or cupcake moulds with butter paper. Add the muffin batter to each mould till 3/4 full. Bake at 160*C for 30 minutes till golden and cooked. 
  • Garnish with grated carrot and serve warm
Note : You can frost these muffins with fresh cream or butter icing and then decorate with grated carrots and serve. The texture will be little soft and dense as we have used whole wheat in the recipe. 


Wednesday, 14 November 2012

" Creamy White & Saffron Ladoos/ Rounds"

How was your Diwali people ... Mine was superb and really enjoyed all the festivities. But, as the week long festival is still not over, I thought of sharing another quick, simple and light sweet recipe today. If you need to treat your brothers tomorrow with something light and tasty, then you should make this one and enjoy it :)
This recipe is of Creamy White and Saffron Ladoos / Rounds or Pedas. 
Enjoy the rest of the festival with some delicious sweets !!!


" Creamy White & Saffron Ladoos/ Rounds"

Ingredients :

1/2 cup condensed milk 
250 gms cottage cheese
food colour - saffron - 5 drops
Rose Water few drops
Cardamom Powder

Preparation:
  • Mash the cottage cheese and make it smooth by rubbing with the palm of your hands or blend it in a mixer for a smooth & creamy consistency.
  • In a non stick pan, add the cottage cheese and condensed milk and mix well. Cook on a low flame till the mixture thickens and leaves the pan sides.
  • Remove from fire. Add rose water and mix well.
  • Remove little mixture potion separately and add food colour and mix well. Keep aside to cool.
  • Remove the remaining mixture in a plate and let it cool completely.
  • Shape the entire white mixture in small round balls. Shape the yellow mixture in small tiny round balls.
  • Now as shown in the recipe pic, press the yellow ball on top of the white one and shape it like a cap or cone. You can always make any other designs of your choice to make it look more attractive. 
  • Stick cardamom powder on top of the rounds.
  • Arrange the laddos ( rounds ) in a plate and serve fresh.
Note : Another option is to fill the yellow mixture inside the white mixture and then shape it in a round. To serve cut it in half and serve it like an egg sweet. If you want a complete saffron coloured ladoo then add the food colour to the entire mixture and then shape them.You can decorate with almonds,pistachios and rose petals.


Sunday, 11 November 2012

Chocolate & Milk Almond Fudge Rolls

Happy Diwali !!!!

The beautiful festival has finally arrived and I am busy preparing for the festivities. Lights, decoration, colours and sweets are all around me and I am loving every bit of it. 
Sweet distribution is one of the most common practise in Diwali. When you visit your loved ones, you bring in a box of sweets presenting your good wishes. The market is flooded with so many coloured sweets but I was little reluctant in buying them considering the amount of adulteration that goes behind in bulk orders.
I made this recipe for my cousin so that they can enjoy the goodness of homemade sweets guiltfree :)

This is a chocolate and milk almond fudge roll that I made for Diwali. Its a very simple recipe and tastes delicious. I was supposed to make Barfis ( squares) but landed up trying a new variation. 
Do try this recipe and share it with your family and friends and stay assured that will vanish off in a jiffy after you serve them :)


"Chocolate & Milk Almond Fudge Rolls"

Ingredients :

250 gms Khoya ( dried whole milk)
100 gms sugar 
1 tsp ghee ( clarified butter)
50 ml water
3 tbsp cocoa powder
few almonds chopped

Preparation:
  • Mash the khoya . Cook it in a non stick pan on with ghee till it turns light pink in colour.
  • Once it leaves the pan sides remove it in a metal bowl.
  • Dissolve the cocoa powder in 1 tbsp of water or milk
  • Bring the water to boil in a pan and add sugar. Dissolve the sugar and stir for a little while till it gets little thick and you get a two to three wire consistency ( take a little syrup on the back of the spoon and leave it. You will see a three wire consistency)
  • Add cocoa liquid to the sugar syrup and stir.
  • Add the sugar mix to the khoya and mix well for even chocolate colour consistency.
  • Spread in a greased plate and let it cool for a while. You can chill it for an hour in the refrigerator.(Once fully cooled and set you have an option of cutting it in squares and serving it like chocolate burfis)
  • For making the rolls, take a big wide spoon and scoop a small section of the mixture. Shape it in a roll with your hands and garnish with chopped almonds. Repeat the same process with the entire mixture to make all the rolls.
  • Store it in an airtight container. You can consume it the same day or if any left then refrigerate the rolls for the next day. 
Note : You can make simple khoya rolls too if you dont like chocolate flavour. The same can be used to make different coloured rolls by adding few drops of food colour to the khoya mixture.
Add pistachios instead of almond for different taste and textures. The rolls will soft resembling a fudge so taste great when eaten fresh. If you dont want to use ghee ( clarified butter) then use 1 tsp of unsalted butter.